The following article details all of the available fields that are on the Employee Details screen, along with their uses within the system. The available selections include;
- Personal Tab
- Dates Tab
- Groups Tab
- Pay Tab
- Special Options Tab
- Leave Tab
- Termination/Notes Tab
- Contacts Tab
- Working Weeks Tab
- Actions Menu
Please see below for how to open the employee details screen.
Then select the employee for whom you would like to edit.

If you are adding a new employee, please refer to the following guide as an initial reference: Adding Employees.
Personal Tab
This tab is used for the basic information that relates to the employee. Items include personal details such as the employee's name, phone number, address, email address, etc.
Also contained on this screen is an External Data section, which contains the following
- Custom ID:
Used for identifying the employee when using the Timesheet Import functionality or when exporting information into another system. - Custom Include:
Used to flag whether or not the employee should be included in particular custom exports.
Dates Tab
This section details the
- Employee Start Date:
Reflects the date the employee commenced employment with the current employer. - Conversion Date:
Reflects the date the employee's entitlements were transferred to ClockOn from the previous management system. - Probation Ends:
Reflects the date on which the employee's probationary employment period ends. This entry generates an Alert before the due date. - Qualifies for Leave:
Determines the date after which a successful leave application can be made. - Period OT Start:
Allows you to enter a period start date in which employees can accrue continuous overtime over several different payroll cycles.
NOTE: The Period OT options require the enablement of the Enable periodic OT setting in the employee's ruleset to unlock the fieldsGroups Tab
This section allows you to indicate the employment
Configuration
- Department (Default)
Indicates the employee's home department within the organisation. This is used for the purposes of
- Drawing the amounts from the attached location's bank account when using the ABA (EFT) file.
- Providing the employee's location for the payroll reporting.
The Customise option on this feature allows you to indicate other departments in which the employee is allowed to work at within the organisation.
- Role (Default)
Indicates the default role that the employee performs within the business, for use when rostering the employee.
The employee can be assigned to additional roles by using the Customise option and setting the Assigned column.
- Category:
Employee categories are used as a means of grouping employees within the workplace. This detail is displayed on the employee's payslips. Additional categories can be added to the system through the Setup >Additional Settings > Payslip Categories screen. - Primary Manager:
Allows users to indicate the employee's direct supervisor. This is used for items such as employee leave management and HR. - Secondary Manager:
Allows users to see a secondary\backup manager for the employee. Like the primary manager option, this is used for items such as employee leave management and HR.
Work Details
- Job Title:
Name of the position held. - Job Description:
Brief description of duties. - Industry Hours:
The number of hours completed in the industry. This can be edited at any time and will be automatically incremented at each payroll based on the number of hours the employee has completed. - SIC:
Standard industry classification is applicable to the employee. For more information, please see the following link https://www.dcceew.gov.au/environment/protection/npi/reporting/industry-reporting-materials/anzsic-code-list.
Pay Tab
This section allows you to enter the payment, tax, and super details relevant to the employee
This is split into 4 separate sections;
- Payroll Details
- Award Configuration
- Tax Details
- Payment Details
- Superannuation
Payroll Details

- Pay Type
Allows you to set whether the employee is paid on an hourly or salary basis. - Hourly Rate
Details the employee's hourly rate of pay. Note that for salaried employees, this will be auto-calculated based on the values in the Salary field as well as the total weekly hours as displayed on the Working Week tab. - Salary
Details the yearly amount that the employee is expected to be paid. Note that for hourly employees, this will be auto-calculated based on the values in the hourly rate field in conjunction with the total weekly hours as displayed on the Working Week tab. - Employment Type
Allows you to specify the type of employment ie Full-Time, Part-Time, Casual, or Other (used for contract agreements). - Pay Period
Allows you to select the payment period cycle that you wish to link the employee to. If not changed, the system will use the option set as default when the account was first established. - Employee Allowances
This allows you to specify allowances that are unique to the employee. For details relating to these settings, please see the Payroll Adjustments (Allowances & Deductions) article.
Award Configuration

- Award
Allows you to select the relevant grouping of rule sets, rate sets, and allowance sets that the employee will be paid under. This includes agreements outside of industry awards. - Rule Set
Allows for a quick selection of the payroll rules that will affect the employee. This includes items such as overtime and/or penalties to be applied, as well as the percentages and conditions for superannuation payments. - Rate Set
Allows you to link the listing of the minimum rates of pay that the employee needs to meet as part of the fair work or contracted requirements. For more information, please see our Rate Sets knowledge base article. - Allowance Set
This feature allows you to assign a pre-built allowance template to the employee. For more information on the settings available with allowances, please see the Payroll Adjustments (Allowances & Deductions) article.
Tax Details

- Tax Category
Indicates the ATO tax schedule that the employee is to be linked to. Once linked, the employee's tax will be calculated automatically at payroll based on their provided payroll information (ie timesheets and before-tax allowance). - Tax Rate
This allows for a custom tax percentage to be applied; this option is only enabled if the Tax Category is set to "ATO Defined". We recommend only using this option with advice from the ATO. - ABN
If the employee has provided an ABN, this can be entered here. This field is mainly used for Contractor employees. - T.F.N.
This is a required field. If the employee has not provided this information, the ATO provides alternatives that can be used until the correct number has been provided. Please see the following ATO link for more details https://www.ato.gov.au/Forms/PAYG-payment-summary---individual-non-business/?page=3 - Gross Pay Type
While also referred to by the ATO as Income Type, this field allows the user to specify the type of employment for the employee.
The available options for this include- Closely Held Employees
A payee that is directly related to the entity from which they receive payments. This includes family members of a family business, directors, or shareholders. - Foreign Employment
This is used for employees who are Australian tax residents who are also subject to tax in another country, for work performed in that country. - Labour-Hire
This includes payments by a business that arranges for persons to perform work or services directly for the clients of that entity. - Salary and Wages
All assessable income paid to employees for work in Australia other than that included in the other income types. - Voluntary Agreement
Used for contractors where they are being paid by the business, the business can elect whether or not to withhold the tax on behalf of the contractor.
For more information, please view the Configuring Contractors article. - Working Holiday Makers
This includes employees, where the income rules are limited based on visa subclasses for foreign residents.
For more information, please view the Configuring Working Holiday Makers article.
- Closely Held Employees
- Country
This allows the user to specify the country of origin for the employee.
Please note that this field is only required for employees with the Gross Pay Type of Working Holiday Makers. - Include In STP
This allows you to selectively include employees to be include\exclude in STP. Please note that this option is only available for employees using the Voluntary Agreement Gross Pay Type. - Medicare Reduction
This allows the user to specify whether the employee is entitled to a reduction in their Medicare liability; the options for this include None, Spouse Only, and Dependents. This value is set for employee onboarding purposes and doesn't affect system calculations. - Dependents
This allows the user to specify the number of dependents that the employee has.
Please note that this field is only required if the Medicare Reduction option Dependents is selected. - Medicare Surcharge
This is used to indicate the Medicare tier that the employee is subject to. This value is set for employee onboarding purposes and doesn't affect system calculations.
Payment Details
ClockOn requires that employees paid using the EFT (Electronic Funds Transfer) method have their personal banking details recorded in the system prior to the payroll process. If this is not completed, then the EFT file will not have the correct information.

ClockOn does not enable direct funds transfer but generates an ABA file designed for the purpose. A third-party electronic banking system is used to import funds into employee bank accounts.
- Payment Method
Allows you to select whether the payment to the employee will be made using Cash, Cheque, or EFT. If the payment type is EFT, then the following additional fields will be available to complete. - Account Name:
Displays the name of the account into which the employee's pay is to be transferred. - Account Number:
Identifies the number linked to the A/c Name used for payroll purposes. - BSB:
Stores the numeric identification of the bank branch linked to the employee.
Superannuation
This section is to assist with the payment of superannuation to the staff, the details can be assigned to the employees. It is required if you choose to make use of the SAFF (Superstream Alternate File Format) files to upload super amounts to simplify your super contributions.

- Superannuation fund:
Super funds can be set up in the system using the instructions in the following guide. Super Funds.
Percentage contributions made by the employer under the Superannuation Guarantee Charge (SGC) are defined in the linked Rule Set. The Administrator is responsible for updating the percentage. Employee personal contributions can be made using the allowances function. - Member number:
This defines the number used by the superannuation fund for the identification of the employee. The member number appears in superannuation reports.
Special Options Tab
This section includes custom options for how the system will treat this employee. This section is split into 3 parts
- Payroll
- Attendance Options
- Timesheet Approval & Validation
Payroll
This section includes options for how the employee will be treated within the payroll process

- Create timesheets from Working Week
This option allows you to use the times established in the Working Week tab to auto-create timesheets at the start of payroll. Timesheets will only be created on days that do not already have an established timesheet. - Auto Create P/H Leave Entries
Uses the public holiday calendar to auto-create public holiday leave timesheets at the point of the payroll creation. As with the previous option, this will only create entries for days where no existing timesheet exists. - Auto Fil Rostered Hours
This option is used to generate timesheet entries based on the start and finish times for rostered shifts. This is useful for employees who are rostered but are not required to clock on or off. - P/H Not Ordinarily Worked Entitlement
This option determines the total length required to automatically create Public holiday leave entries when an employee does not ordinarily work on that day.
Attendance Options

- Allow Non Rostered Clock On/Off
If enabled, this option grants the employee the ability to clock their times in the system without the need for an associated shift time in the system. This is useful for employers that do not require a roster, or for employees who frequently do additional shifts during a payroll period. - Default Break / Non-rostered Break
Allows you to set the time (or override the default break from the location manager) that will be automatically associated with the employee's timesheets in the event of a non-rostered shift. - Allow Clock On / Off using Working Week
Allows you to use the start and end times from the employee's working week tab to automatically build shifts when the employee clocks non-rostered times. - Allow default location geofence
This setting will allow the automatic use of the geofence map settings from the employee's home location when time sheets are created.
Employee Services
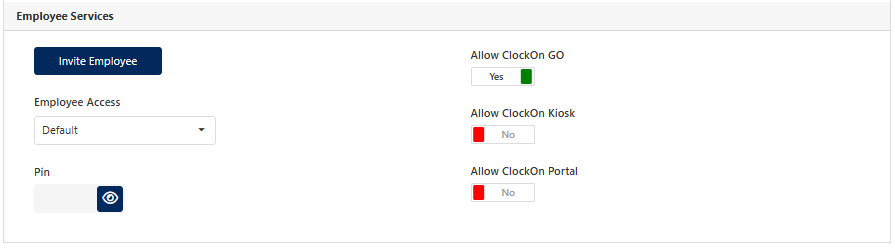
- Invite Employee
Allows employees to be sent an invitation to create a password for employee system access. This is required for granting access to the employees for ClockOn GO and the ClockOn employee portal. - Employee Access
Allows employees to be set against an Employee Access Group. These are used to control access to the employee self-service features within the system. - Pin
Used in conjunction with the ClockOn Kiosk, this generates a 4-digit code for use when clocking their times. - Allow ClockOn GO
Used for the granting of access to the employee self-service app ClockOn GO. For more information, please see the ClockOn GO Invitations knowledge base article. - Allow ClockOn Kiosk
Used for granting access to the employee to record their clock times through the ClockOn Kiosk app. For more information, please see the ClockOn Kiosk knowledge base article. - Allow ClockOn Portal
Used for granting access to the employee self-service website. For guides on the features available to employees using this feature, please see the Employee Self-Service articles.
Please note that the usage of ClockOn GO, Kiosk, and the Employee Portal may require addon\subscription changes. For more information please see our Subscriptions Manager article.Leave Tab
This tab details the employee's current leave entitlement. ClockOn supports the tracking of the following leave categories
- Statutory Annual Leave
- Additional Annual Leave
- Special Annual Leave
- Leave Loading Withheld
- Personal Leave
- Time On Lieu
- RDO
- Long Service Leave
For information on how to set up leave accruals for staff in the system, please see our Rule Set - Leave Configuration knowledge base article.
The balances on this screen are as of the last payroll and do not take into account future unprocessed leave timesheets.
Statutory Annual Leave
This is the main annual leave category and is used to track the annual leave as set out in the National Employment Standards under Annual Leave.

Within ClockOn, this is split into 3 different columns
- Opening Balance (Hours)
The balance of entitlement that the employee has earned prior to their current employment year - Pro-Rata
The balance of entitlement that the employee has currently earned or taken within their current employment year. - Total
The accumulated total of the two previous fields indicates the full available entitlement to the employee.
Additional Annual Leave
Used primarily for shift workers to provide an additional amount of leave entitlement when employees reach a preset number of Sundays or Public holidays worked within an employment year.

The top row uses the same opening balance, pro rata, and total logic as the statutory annual leave.
The second line indicates the following;
- Opening Balance Sun/HP Paid Days
Indicates the total number of Sundays and Public Holidays that the employee has worked over their employment, where the Additional Annual Leave option has been enabled in the ruleset. - Pro-Rata
provides a count of the Sundays and Public Holidays that the employee has worked within their current employment year.
Special Annual Leave
Allows you to accrue an additional balance of leave as well as pay at a set percentage for timesheets worked on public holidays.
The fields in this category use the same opening balance, pro-rata, and total logic as the statutory annual leave.

Leave Loading Withheld
Leave loading is usually directly linked and paid out alongside annual leave when looking at timesheets. If a payout is made then the balance will be deducted from the listed balance on this screen.

This item will not accrue on a per-payroll basis.
Personal Leave
This is the leave category and is used to track personal leave as set out in the National Employment Standards under Sick and carer's leave.
The fields in this category use the same opening balance, pro-rata, and total logic as the statutory annual leave.

Time In Lieu
This leave category is used to track the accrued overtime that has been converted to a Time In Lieu balance, which is recorded in hours.

RDO
Allows you to track the accrued hourly balance of rostered days off

Long Service Leave
Allows you to view the accrual of long service leave that the employee has accumulated to date. By default, this is listed in weeks, however, if the business needs require this to be managed in hours, this can be adjusted within the Rule set.

ClockOn defines a week by what is currently listed on the employee within the Working Weeks tab.
Termination/Notes Tab
This tab is designed to allow you to initiate the termination process of an employee in the system, as well as provide a space for custom notes to be added to the employee record.
It also includes a section to indicate the user's acceptance of the FairWork statement documentation. This is used in the Employee onboarding process through the use of FLARE.
For more information on how to finalise an employee with ClockOn, please see our Employee Terminations knowledge base article.

Contacts Tab
The contacts tab provides an optional point of reference for the employee's next of kin as well as previous employment contacts.

Working Weeks Tab
The working week works as the basis for the employment hours for several areas in the system, some of these include the standard weekly wage for determining in lieu of notice LSL payouts and tax calculations during employment terminations, and long service leave payouts, as well as determining which days to add time sheets for when approving leave requests in the system.
Each employee needs at least one week listed on their profile. By default, this will be based on a 5-day at 7.6 hours per day for a total of a 38-hours week. This can be customisable based on the contract with the employee.
You also have the option to enter either the start and end times for each standard workday,

Or just enter the total length.

Multiple weeks can be added to indicate a rotating standard roster.
NOTE: When using multiple weeks, the Current Week Number value is based on the employee's next payroll cycle, not the current date.
It can also be used in conjunction with methods to auto-generate shifts using this as a standard roster template using the following options located in the Special Options tab.
- Create timesheets from Working Week
- Allow Clock On / Off using Working Week
Keep in mind that if the above options are used, then the start, end, and break times need to be set.
Actions Menu
The Actions menu is available to access some specific advanced features for the employee instance

Available options include;
- Documents
- Employment History
- Invite to Flare Benefits
- Qualifications
- Terminate
- Unavailability
- YTD Balances
- YTD Opening Balances
- Delete
Documents
This option allows for the upload and linking of employee files for storage in the ClockOn system. This can be typically used for any items like employee contracts, qualification certificates, or any document where an employee signature is required.
Individual files cannot exceed a size of 2mb, and the system will only allow the following file formats to be uploaded:
JPEG, PNG, CSV, JPG, XLS, XLSX, DOCX, DOC, PDF, TXT.
Uploaded documents can be viewed, or removed using the Options button.

Employment History
The employment history section allows for the recording of previous work instances that the employee has undertaken either within this business or from previous companies.

When adding an instance, you can enter the company name, job title, start & end dates, the employment type, and the category for the change of employment.

Invite to Flare Benefits
This is an opt-in feature to our Flare Benefits integration. This allows you to invite employees to access the FLARE system to access discount vouchers.
Qualifications
Qualifications allow you to set a level of expertise against the employee instance. This is useful when rostering staff when a particular certificate or requirement is needed. An example may be a first aid certificate or a site keyholder requirement.
For more information, please see our Roles & Qualifications article.
Terminate
When the team members' time with the business draws to a close, you will need to run the termination process to finalise their ClockOn employee instance. This process is started either within the Employee profile under the Termination/Notes tab or by using the Terminate button. For more information on this process, please see our Employee Terminations article.
Unavailability
The system allows you to enter employee unavailability to allow for notes when building the rosters. For more information on this process and usage, please see our Employee Unavailability article.
YTD Balances
The year-to-date balances (YTD Balances) screen allows you to see a view of what the employees have had processed through payroll by financial year.
YTD Opening Balances
This section is used to enter balances for employees from a previous system. This is generally used to accurately reflect the employee's pay for the financial year across both systems without the need for re-processing the previous amounts into the system. This also has the option of whether to include these balances in the STP upload (default off)
Delete
This is used to remove an employee from the system. This is only possible if the employee has no previous links in the system, such as time sheets, rosters, processed payrolls, STP submissions, or reports. If they have been included in any of these, then the better solution would be to terminate the team member instead to retain the processing history.