You may have a situation where you would like to grant additional access to your ClockOn system to another employee or third party, you can do this by using the User Security options within the system as detailed below.
This article contains the following items:
- Inviting Users and Managing Access
- Invited Employee Setup
- Security Roles
- Custom Security Roles
- Duplicating Existing Security Roles
- Department Access
Inviting Users and Managing Access
To grant your employees access to your system, first, open the Additional Settings screen from the Setup menu bar

Next select the User Access option

This screen will show you a list of contacts that you have previously granted access to.

To add another click the + Add User button

Enter the name and email address details of the team member that you would like to invite. You will also need to indicate the Role-based on what you would like them to manage as this will affect their access within the ClockOn system.

Once added, Click Send and Invite
You will be returned to the User list, and the new employee will receive an invite to create an account in the system

Invited Employee Setup
PLEASE NOTE: The invitations cannot be accepted while logged in as another user, also if you already have a ClockOn user account, you will need to login to accept the new invitation.
Once invited into the system the user will receive an email with a View Invitation link, click on this to proceed.

This will take you to an account verification screen where you can check your details, and create a password

Complete this form and once ready, click Accept button to continue.
Once successful you will see the Invitation Accepted prompt and you can begin using the system.

Security Roles
When logging into ClockOn as the owner of the account you will have the full level of access to the system. Employees that you invite will need to have an appropriate level assigned to them as per their job requirement
The following 3 security levels are pre-built into the system.
- Administrator
- Payroll Officer
- Timesheet Officer
Below is a grid detailing what The following details the access granted under each security role
PLEASE NOTE: The options within are locked, If you would like to make your own customisable security levels please scroll down past this table.
| Category | Item | Owner | Administrator | Payroll Officer | Timesheet Officer |
| Award Manager | Award Manager | Yes | Yes | Yes | No |
| HR | Authorised Signatory | Yes | Yes | No | No |
| Documents | Yes | Yes | No | No | |
| Employee Breakdowns | Yes | Yes | No | No | |
| Incident Reports | Yes | Yes | No | No | |
| Task Edit | Yes | Yes | No | No | |
| Teams Edit | Yes | Yes | No | No | |
| Import Export Data | Access Exports | Yes | Yes | Yes | No |
| Intergration Journals | Yes | Yes | Yes | No | |
| Integration Setup | Yes | Yes | No | No | |
| Integration Wizard | Yes | Yes | Yes | No | |
| Time sheet Import | Yes | Yes | Yes | Yes | |
| Organisations | Account Details | Yes | Yes | No | No |
| Subscription Manager | Yes | No | No | No | |
| Payroll | Payroll Wizard | Yes | Yes | Yes | No |
| STP Wizard | Yes | Yes | Yes | No | |
| Super Payments | Yes | Yes | Yes | No | |
| Reports | Data - Financial | Yes | Yes | Yes | No |
| Employee Reports | Yes | Yes | Yes | No | |
| Payroll Reports | Yes | Yes | Yes | No | |
| Time sheet Reports | Yes | Yes | Yes | Yes | |
| Requests | Employee Requests | Yes | Yes | Yes | Yes |
| Settings | Employee Groups | Yes | Yes | No | No |
| Leave Categories | Yes | Yes | Yes | No | |
| Pay Periods | Yes | Yes | Yes | No | |
| Payslip Categories | Yes | Yes | Yes | No | |
| Public Holidays | Yes | Yes | Yes | No | |
| Qualifications | Yes | Yes | No | No | |
| Security | Yes | Yes | No | No | |
| Super Funds | Yes | Yes | Yes | No | |
| System Settings | Yes | Yes | No | No | |
| Setup | Allowances | Yes | Yes | Yes | No |
| ClockOn Kiosk | Yes | Yes | No | No | |
| Employees - Add | Yes | Yes | Yes | Yes | |
| Employees - Bulk Apply | Yes | Yes | No | No | |
| Employees - Modify | Yes | Yes | Yes - Enabled | No | |
| Locations | Yes | Yes | Yes | No | |
| Rates Sets | Yes | Yes | Yes | No | |
| Rule Sets | Yes | Yes | Yes | No | |
| Templates | Yes | Yes | No | No | |
| Time Sheets | Employee Roster | Yes | Yes | Yes - Enabled | Yes - Enabled |
| Employee Roster Cost | Yes | Yes | Yes | No | |
| Leave Overview | Yes | Yes | No | No | |
| Time Sheet Lockdown | Yes | Yes | Yes | No | |
| Time Sheets | Yes | Yes | Yes | Yes |
Please note that if a user tries to access an area that they are do not have access to, they will recieve the following prompt. If you wish to extend their access please see the User Access screen as mentioned earlier.

Custom Security Roles
ClockOn allows you to create your own custom levels of security in the system that can be linked to the users that you have invited into your system.
To do this open the User Access screen as previously detailed and click the Roles button

Next, click + Add Role

You will now see a screen that allows you to name and customise the access that you would like to grant based on the employee's level of access to the system.

The left side indicates the parent category for the options, while the right indicates the options under this set.
If you would like to enable the full set of available options tick the category, you can tick the checkbox.

If there are some items within a category that are not selected, the category will be denoted with a box. This is to indicate that the employees that are on this level have limited access to these features.

INFO: In order to remove a custom security role you will first need to ensure that there are no users are linked to the role.Duplicating Existing Security Roles
As an alternative to creating new roles from scratch, you can also duplicate and existing role by using the Options > Duplicate option.
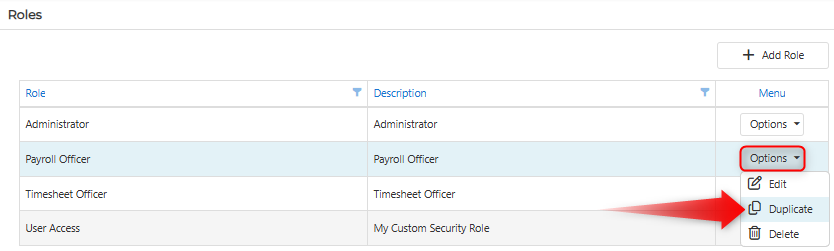
If using this feature, we recommend verifying the settings within the duplicated role be sure to check and confirm that the expected items are enabled/disabled to avoid unexpected user access issues.
Department Access
Also available is the ability to selectively restrict access to employees under locations and departments to the users attached to the custom user role. This feature is available within the "Locations" Tab.

Note: The above feature is disabled on the three default security roles, a custom security role is required.To enable this adjust the "Apply Location/Department access" to "Yes". After doing this you can selectively tick on entire locations, or selectively set the departments within the locations.

Useful Tip: If the security is ticked on at the location level, the users attached to this location will also be able to see any new departments added in the future for this site without the need for adjustments to these settings.